Gluten Free Carrot Cake Perfect For Mother’s Day


carrot cake v2

I made this cake for my mum’s birthday a week ago and she loved it so much she asked me if I would make it again. As it is mothers day on Sunday I have decided to make it again!

I found a recipe for a cake I had made before which worked well but as I’m now on a gluten free diet I needed to adapt the recipe. I also thought it would be good if the recipe had reduced sugar as I’m trying to cut down on sugar in my diet.

carrot cake v1

This cake is made with coconut sugar and has maple syrup in the coconut and orange  frosting. This means the cake is much better for you, so don’t feel bad if you have a second slice in the same day!  I also wanted to add extra spice to the cake to help add natural sweetness.

carrot cake v4

Make sure you buy the ingredients for the coconut frosting the day before. The coconut frosting requires you to put a can of coconut milk in the fridge overnight, so the top sets and you can whisk it up to make the frosting the next day.

carrot cake v3

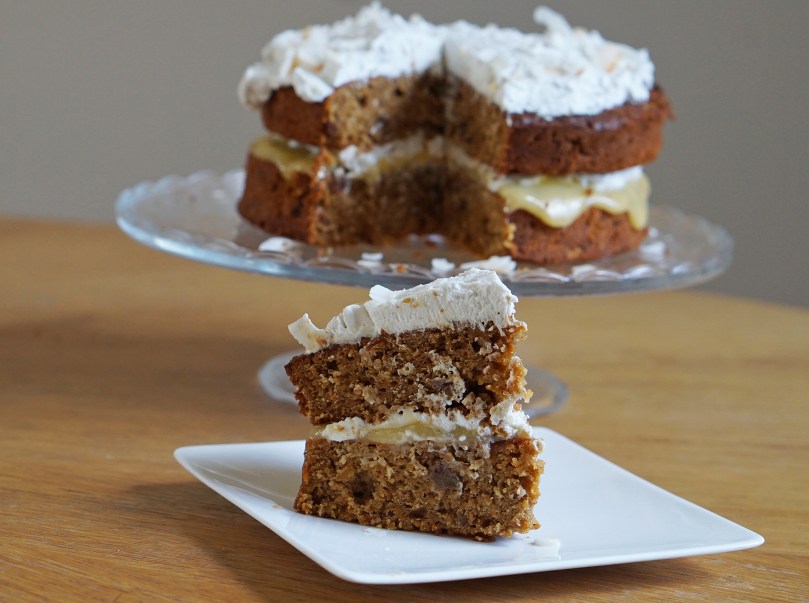
Recipe: Gluten free Carrot Cake with coconut and orange cream frosting with lemon curd.

For the cake: (Recipe adapted from the book ‘Great British Bake Off Everyday’)

Ingredients:

For cake:

  • 4 large eggs
  • 125ml light olive oil
  • 230g coconut sugar
  • 225g gluten free plain flour
  • 2 ½ tsp gluten free baking powder
  • ½ tsp xanthan gum
  • 1 tsp ground cinnamon
  • ¼ tsp ground cloves
  • 1 tsp allspice
  • 375g carrot grated  (6-7 medium size carrots  ) but if you have less amount don’t worry
  • 75g desiccated coconut
  • 100g raisins
  • Zest of one orange

For the syrup:

  • 1 orange
  • 1 lemon

For the frosting:

  • 1 zest of an orange
  • 1 tsp maple syrup (can add more depending how sweet you want it)
  • 2 x 400ml can of coconut milk (Put into the fridge the night before to harden)

Half a jar of lemon curd (optional)

To decorate:

pistachio nuts , desiccated coconut and orange zest

Method:

  1. Firstly make the cake. Prepare 2 x 20.5cm cake tins greased with butter and the base lined with parchment paper. Preheat your oven to 180° / 350 °F/gas 4 .
  2. Put the eggs , olive oil and coconut sugar in a bowl, whisk with a free stand mixer with the whisk attachment or with a hand held electric whisk for 5 mins until everything is frothy.
  3. Sift the flours, baking powder, xanthan gum and spices into a bowl and gently fold with a metal spoon until everything is combined.  Add the grated carrot, coconut, raisins and zest of an orange to the bowl and fold in with a spoon until everything is incorporated.
  4. Spoon the mixture into the prepared tins and spread out evenly, making sure to get to the corners and you have smoothed the top. Put into the oven and bake for 35 mins until a skewer comes out clean.
  5. While the cakes are cooking make the syrup. Put the juice of an orange and lemon in a pan and reduce for 10 mins. (I don’t add sugar) .
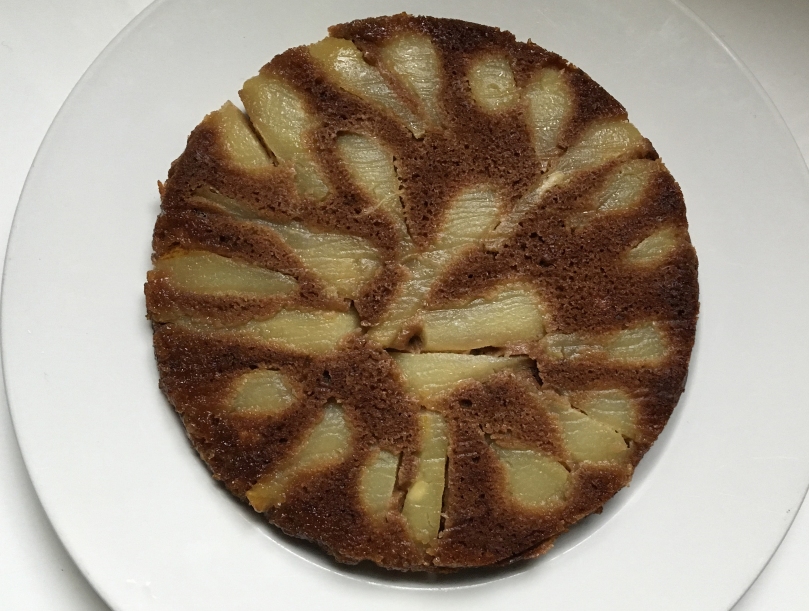
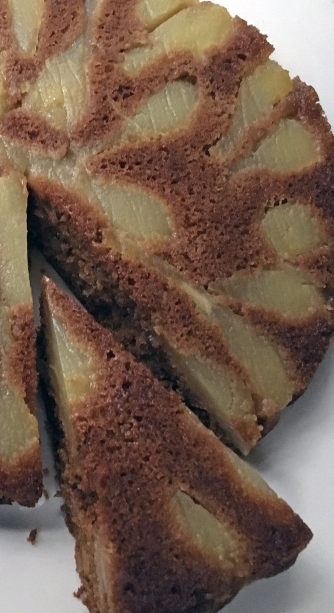
  6.  Once cooked take out of the oven leave for 5 mins, take out of the tin and place on a cooling rack. While the cake is still warm make small holes with a skewer in the sponge and pour in the syrup .
  7. While the cake is cooling make the coconut frosting. Take the coconut cans of milk out of the fridge and scrape the top that has set over night into a bowl (you don’t need the liquid bit at the bottom. It can be used for homemade curry later in the week. Whisk until soft peaks form, the add the zest of an orange and 1 tsp of maple syrup and whisk for a further 3 mins. Add more maple syrup if you want depending how sweet you want it.
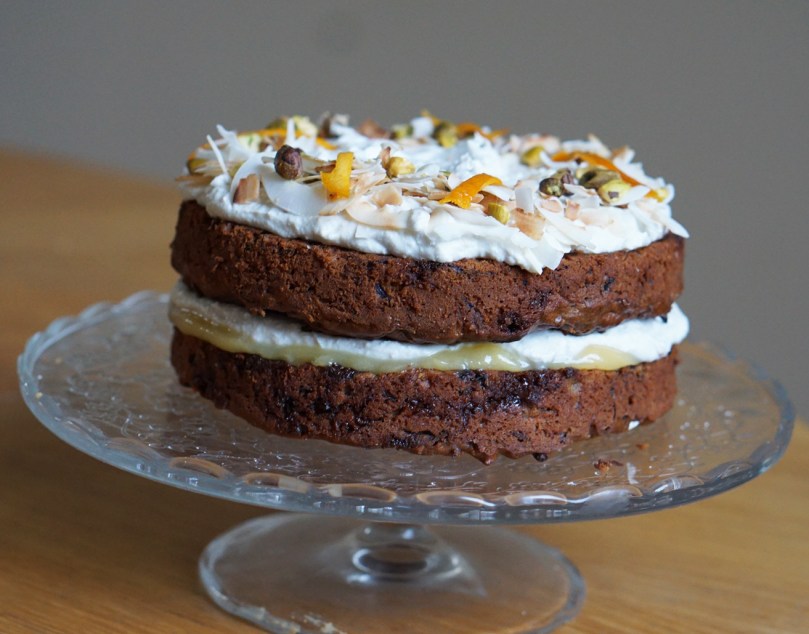
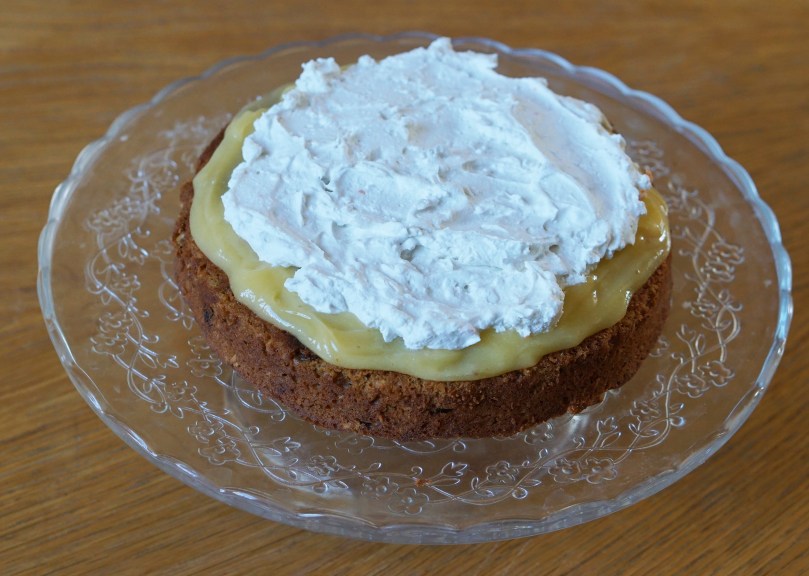
  8. Once the cake is completely cool then start assembling the cake . Place one of the cakes upside down on the cake stand or plate depending what your going to serve it on . Spread half the jar of lemon curd on the cake  ( if you are using it) and then add half of the coconut frosting. Place the other cake on top and spread the rest of the coconut frosting .
  9. To decorate lightly toast desiccated coconut for 5 mins in a pan, until it goes lightly brown, Put on top of the cake then sprinkle pistachio nuts and add zest of an orange.

Enjoy!


Gluten free and refined sugar free pear and walnut cake

picture 3


For the past year I have wanted to stop eating cakes made with refined sugar, now I have lost my sweet tooth.  I still like to make and eat a dessert for a celebration or if we have people over for dinner.

At Christmas I received a fantastic cook book from my cousin, which is gluten free and refined sugar free, called ‘Clean Cakes’ by Henrietta Inman. I decided I wanted this to be the first recipe I tried, because my dad and I love desserts made with pear.

picture 1

I served this cake on boxing day, along side my mince pies, to my family and did not tell them it was refined sugar free . It had the seal of approval so I had to share this recipe with you. This recipe is made with coconut sugar which really works with the walnut. This cake is very light in texture which I was not expecting. It tastes delicious! This cake keeps really well in a tin for up to five days.

You must try this recipe as it has changed my perception of baking refined sugar free. In my opinion it one of the best cakes I have tasted .

I really recommend any one to buy the book ‘Clean Cakes’.

picture 2

Recipe : Gluten free and refined sugar free cake from the book ‘Clean Cakes’  by Henrietta Inman

Ingredients;

  • 70g chopped walnuts
  • 180g raw honey
  • 5 large pears
  • 120g unsalted butter
  • 80g apple puree
  • 60g brown rice flour
  • 80g coconut sugar
  • 60g teff flour
  • ½ tsp vanilla extract
  • 2½ tbsp arrowroot
  • ½ tsp gluten free baking powder
  • ½ tsp bicarbonate of soda
  • ¼ tsp xanthan gum
  • ½ tsp salt
  • 2 eggs

Method;

  1. Heat the oven to 170ºc fan/325ºc/Gas Mark 3. Grease and line the bottom and sides of a 23cm spring form cake tin.
  2. Line a baking tray with baking parchment and spread the walnuts on top. Toast for 5 mins and then allow to cool before chopping into small pieces.
  3. Spoon the honey into the base of the tin. Peel and slice the pears then arrange into the base of the tin.
  4. Using a mixer. whisk the butter, sugar, apple puree and vanilla extract until soft and smooth. Combine the flour, arrowroot, baking powder, bicarbonate of soda, xanthan gum and salt. Change the whisk to a paddle then add the dry ingredients a table spoon at a time alternating with the egg (this can be done by hand). Finally add the chopped walnuts.
  5. Spoon the mixture over the pears and bake for 30 minutes.
  6. Leave to cool in the tin for about 30 minutes and then remove the sides. Invert on a plate and then remove the bottom of the tin and paper.

Enjoy !!!

Gluten Free Victoria Sponge

blog picture 1

My favourite cake is a good old Victoria sponge. I make it with gluten free flour but you can just use normal flour if you like. It is fantastic with homemade jam and vanilla buttercream.

Recently I went on a jam making course for my birthday and I picked up some great tips.  (look out for my next post which will be on me making homemade jam.)

blog picture 2

I know some people think that gluten free cakes can be dense but I found if you use the creaming method instead of the all in one method and fold in the flour it makes a nice light cake.

175

Enjoy

Recipe: Gluten Free Victoria Sponge

Ingredients:

  • 175g gluten free self rasing flour
  • 175g golden caster sugar
  • 175g unsalted butter
  • 4 eggs
  • 1/4 tsp vanilla bean paste

For the filling

  • One batch of buttercream
  • 1/4 jar of strawberry jam

For the buttercream:

  • 160g icing sugar
  • 70g butter
  • 1/4 tsp vanilla bean paste

Method:

  1. Preheat the oven to 160 fan. Line two 180cm cake tins with parchment paper at the bottom of the tin and butter the sides.
  2. Cream the butter vanilla paste and sugar in a bowl for 5 mins until the butter and sugar is light and fluffy.
  3. Then measure out the flour in a bowl and set aside.
  4. Crack the eggs in a jug and mix with a fork.
  5. Then put the mixer of a medium speed and pour a third of the egg into the butter and sugar then beat in. Add a tablespoon of flour and mix in . (This will stop the mixer from splitting)
  6. Repeat this step until all the egg is incorporated.
  7. Finally fold in the rest of the flour.
  8. Once folded in do a final stir to make sure every thing is incorporated and spoon the mixture evenly between both tins.
  9. Place in the oven for 30-35 mins, the cakes will be done when a skewer come out clean.
  10. While the cake is cooking make the buttercream put the all the butter, icing sugar and vanilla paste in a bowl and mix until it comes together as a creamed mixture it may take time.
  11. When the cakes are ready to come out of the oven put a timer on and leave them to cool for 10 mins in the tin after 10 mins take the cake out of the tin and leave to cool completely
  12. Once cooled spread the jam on one of the cakes and spread the buttercream on the other cake. Then place the butter cream cake on top of the jam layer.
  13. ( Doing this instead of putting the jam and buttercream on the same layer will mean that the buttercream will not run into the jam so when you cut into the cake you will have defined layers. )